Wednesday, 24 October 2007

Disable Foreign Key Check Under MySQL


Mysql::Error: #23000Cannot add or update a child row: a foreign key constraint fails
(`depot_development/line_items`,
CONSTRAINT `fk_items_product` FOREIGN KEY (`product_id`) REFERENCES `products` (`id`)
ON DELETE CASCADE): INSERT INTO line_items (`quantity`, `product_id`, `id`,
`unit_price`) VALUES (1, 1, 1, 29.95)

OR

ActiveRecord::StatementInvalid: Mysql::Error:
Cannot delete or update a parent row: a foreign key constraint fails:
DELETE FROM line_items WHERE id = 1


If you've ever gotten the above error message from unit testing with Rails, this is what you gotta do.

Turn off constraints when fixtures are loaded to run unit tests by adding the following to the end of test_helper.rb:


class Fixtures
def delete_existing_fixtures_with_fk_checks_disabled
@connection.update "SET FOREIGN_KEY_CHECKS = 0"
delete_existing_fixtures_without_fk_checks_disabled
@connection.update "SET FOREIGN_KEY_CHECKS = 1"
end

def insert_fixtures_with_fk_checks_disabled
@connection.update "SET FOREIGN_KEY_CHECKS = 0"
insert_fixtures_without_fk_checks_disabled
@connection.update "SET FOREIGN_KEY_CHECKS = 1"
end

alias_method_chain :delete_existing_fixtures, :fk_checks_disabled unless method_defined?(:delete_existing_fixtures_without_fk_checks_disabled)
alias_method_chain :insert_fixtures, :fk_checks_disabled unless method_defined?(:insert_fixtures_without_fk_checks_disabled)
end


Read more about it here.

Tuesday, 23 October 2007

Testing Stage

Seems like I've pretty much finished my coding. Perhaps a little bit of tweaking now and there.

Will begin to write up testing reports and fix any bugs that arises. Also commenting all of my code as I go along.

Marko and I will be integrating our code together tomorrow as he needs my user function and also my stylesheet.

8 days to go...

Gruff Graph Customisation


I've just managed to get my graph customisation up and running. You can now graph three different types of graph: pie, stackedbar and sidestackedbar.


The variables that you can customise are the width of the image in pixels, (automatically sets it to 4:3 ratio), graphing by project or job, data breakdown and specified flow.


Not all of these customisations are available to all graphs but the javascript control handles what the user can select. Different graphs work differently.

The way a pie graph handles data is by accepting a number, attached with the data identifier.


# Example of adding data to a pie graph.
g.data("Data Identifier", 50)


The way a sidestackedbar/stackedbar graph handles data is by accepting an array of values, attached with the data identifier.


# Example of adding data to a sidestackedbar/stackedbar graph.
g.data("Data Identifier", [1, 2, 5])


Of course there are so many other customisations that can be implemented but I don't think I have time to implement them. This will do for now.

For Gruff API reference, click here. Gruff samples can also be seen here.

Saturday, 20 October 2007

Syntax Highlighter

I've just installed Google's Syntax Highlighter. This javascript allows you to highlight codes without formatting it manually.

To use, simply do

<pre name="code" class="language">
...some code here...
</pre>

A wiki of usage can be found here.

NOTE: One important thing to watch out for is opening triangular bracket <. It must be replaced with an HTML equivalent of < in all cases. Failure to do won't break the page, but might break the source code displayed.

Here's a list of supported languages and their aliases:

Language Aliases
C++ cpp, c, c++
C# c#, c-sharp, csharp
CSS css
Delphi delphi, pascal
Java java
Java Script js, jscript, javascript
PHP php
Python py, python
Ruby rb, ruby, rails, ror
Sql sql
VB vb, vb.net
XML/HTML xml, html, xhtml, xslt

Friday, 19 October 2007

Converting binary data to image in HTML

Let's say you were making an Ajax request for an image, and the response is a base64 encoded string which you want to use to create an image in HTML. A way of doing so is to use "data:image/png;base64," at the start of your image source, and append the encoded string.

For example,

<img='data:image/<image format>;base64,<encoded string>' />

This will correctly render the encoded string into an image that can be displayed on the browser.

Using Gruff to create graphs, the Gruff::Base has a method called to_blob which draws the graph and returns the graph as a rendered binary. Simply return a base64 encoded version of it to the Ajax call to be processed.


# Controller
g = Gruff::Pie.new(300)
.
.
.

render :text => encode64(g.to_blob)

Creating hover menus and closing them with Javascript + Prototype

First of all I created an empty div that will be used to contain my menu contents. For example,

<div id="accesslist" class="accessmenu">Hello there!</div>

With CSS,


div.accessmenu {
position: absolute;
background: #F5F5F5;
border: 1px solid #888;
margin: 0;
padding: 3px;
visibility: hidden;
}

Now it's up to you how you want to position the menu, but this is how I did it with Javascript.

$('accesslist').style.left = Position.positionedOffset(el)[0];
$('accesslist').style.top = Position.positionedOffset(el)[1] + el.offsetHeight;
$('accesslist').style.zIndex = 10;
$('accesslist').style.visibility = 'visible';

The code above will place the div directly below element 'el'. Now the problem is how do you close the menu when you click away from it? A simple solution can be found using prototype's Event class.

Event.observe(document.body, 'click', function(e) {
if (!Element.descendantOf(Event.element(e), $('accesslist')))
$('accesslist').style.visibility = 'hidden';
});

What this code does is that it observes 'click' events that occur on the document.body. The third function parameter checks if the event click happened on my menu element's descendants (i.e. down the tree hierarchy). If not, then close the menu.

Simple.

Thursday, 18 October 2007

Foreign Key in MySQL Error #1452 and #1216

This has caused me 3-4 hours of time wasting and it is so bloody simple! I can't believe after googling for so many hours that I could not find something that could solve this problem for me.

If you've came across an error #1452 when trying to add a foreign key and you have existing entries in the table, you need to make sure there are valid values in all entries in the foreign key column before creating a foreign key.

So what I did was do a zero fill on the foreign key column. Sweet I thought. This should fix it. After trying to create the foreign key again, I get an error #1216. Turns out that the values in the foreign key column must be valid (i.e. correspond to a valid id to referenced table) and the zero fill obviously didn't help because I dont have any id with 0.

Once you've entered valid values in, the foreign key creation should work! Make sure that the column in the referenced table is a primary key or an index and foreign key column is an index before proceeding.

Wednesday, 17 October 2007

Progress Update

Have been working on budgeting functionalities this past couple of weeks. Seems like I've managed to get these things working though it may require further testing.

  1. Transactions - Add/Edit/Delete (admin, member, guest)
  2. Jobs - Add/Edit/Delete (admin) [job description might still need some work]
  3. Projects - Add (all) [need to do edit and delete]
  4. Members - Add/Delete (admin) [need to do permission editing]
All this is done using javascript and ajax. A lot of fiddling around but its getting there.

Friday, 12 October 2007

Tax function

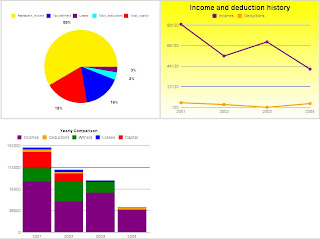
Functionality for the tax function is complete. Graphing and reporting is coming to completion:


Tuesday, 2 October 2007

ImageMagick / RMagick / Gruff - Installation

Installing RMagick is known to be a complex procedure, especially with an InstantRails environment. The first step is to download the RMagick-win32 package from the following location:

http://rubyforge.org/frs/download.php/24863/RMagick-1.14.1_IM-6.3.0-7-Q8-2.zip


Very nice...

The standard procedure, found in the file called README.html in the above archive, should generally be followed. However, the following modifications will need to be inserted for the installation to work with the InstantRails environment and to obtain the functionality required for FoR:

--------------------------------------
set HTTP_PROXY=http://proxy:port #(check for proxy and port in firefox)

gem update --system -y

gem install rmagick --local

gem install gruff -y


add to environment.rb -> require 'rubygems'

#also add "require 'RMagick'" to necessary controllers

#also add "require 'gruff'" in the controllers which are going to create gruff graphs
--------------------------------------

The following links may also be of use during installation:

http://docs.rubygems.org/read/chapter/3#page70
http://nubyonrails.com/pages/gruff
http://geoffreygrosenbach.com/projects/show/5